Important structures such as boilers and pressure vessels require safe penetration of joints, but due to limitations in structure size and shape, double-sided welding is sometimes impossible. A special operation method that can only create a single-sided groove is single-sided welding and double-sided formation technology. It is a more difficult operating skill in manual arc welding.
During vertical welding, because the temperature of the molten pool is too high, under the action of gravity, the droplets formed by the melting of the welding rod and the molten iron in the molten pool tend to flow down to form weld nodules and undercuts on both sides of the weld.
When the temperature is too low, slag inclusions are likely to occur, and defects such as incomplete welding and welding nodules are easily formed on the reverse side, making it difficult to form the weld.
The temperature of the molten pool is not easy to determine directly, but it is related to the shape and size of the molten pool. Therefore, as long as you carefully observe and control the shape and size of the molten pool during welding, you can control the molten pool temperature and ensure the welding quality.
Based on many years of practical experience, this rule can be summarized in the following sentences:
The angle of the welding rod is very important and the welding specifications are indispensable.
During vertical welding, the droplets formed by the melting of the welding rod and the molten iron in the molten pool tend to flow down to form weld nodules, and undercuts are formed on both sides of the weld, which worsens the weld shape. Master the correct welding specifications and adjust the electrode angle and electrode transport speed according to changes in welding conditions.
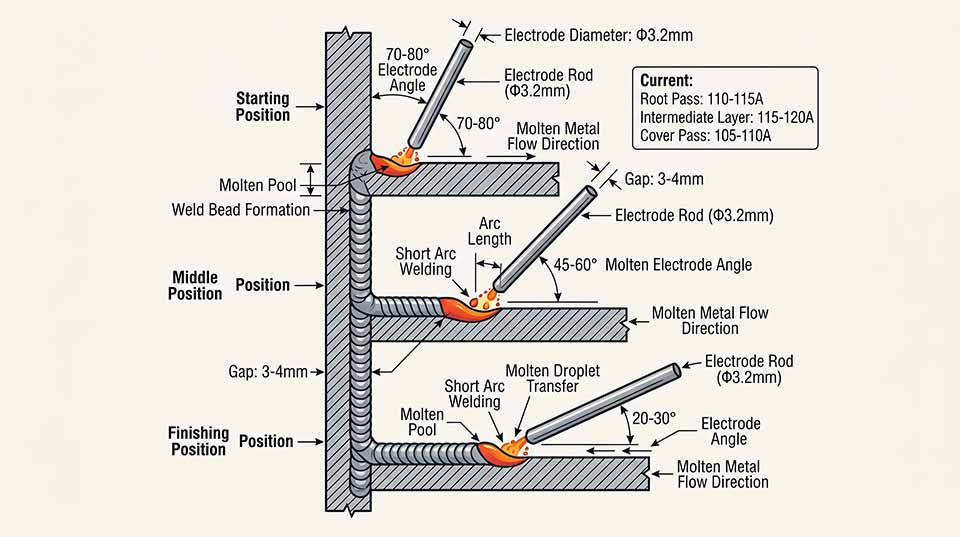
The angle between the welding rod and the surface of the weldment is 90° in the left and right directions, and the angle with the weld is 70° to 80° at the beginning of welding, 45° to 60° in the middle, and 20° to 30° at the end. The assembly gap is 3 to 4mm. A smaller electrode diameter of Φ3.2mm and a smaller welding current should be used. The bottom welding is 110~115A, the middle transition layer is 115~120A, and the cover layer is 105~110A.
The current is generally 12% to 15% smaller than that of flat welding to reduce the volume of the molten pool and reduce the influence of gravity, which is beneficial to the excess of molten droplets. Short arc welding is used to shorten the distance between the molten droplets and the molten pool to form a short-circuit transition.
Observe the melt pool, listen to the arc sound, and keep the shape of the melt hole in mind.
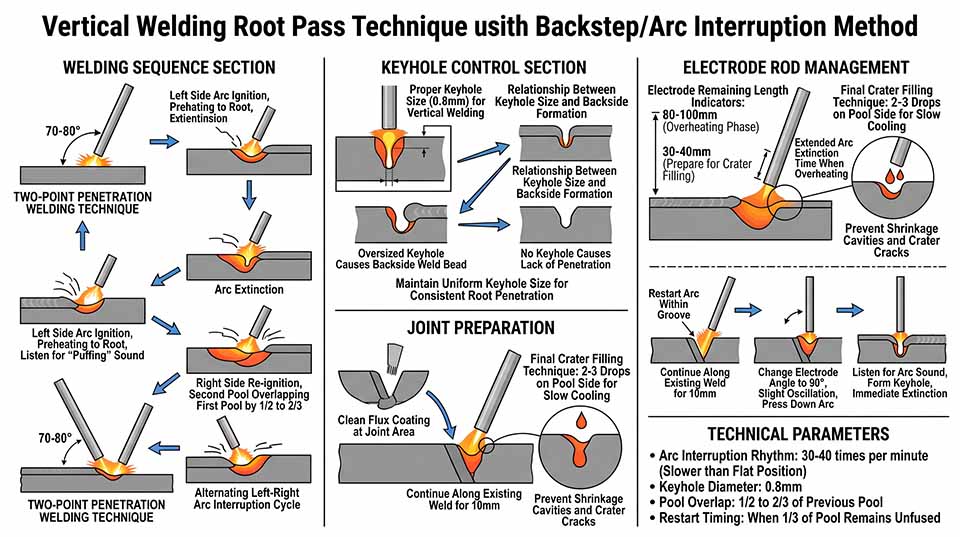
Bottom welding at the root of the weld is a key to ensuring welding quality. The arc extinguishing method is used for welding. The arc extinguishing rhythm of vertical welding is slightly slower than that of flat welding, 30 to 40 times per minute. The arc burns slightly longer during each point of welding, so the weld meat of vertical welding is thicker than that of flat welding.
When welding, start welding from the lower end. The angle of the bottom electrode is about 70° to 80°. Two-click penetration welding is used. The arc is ignited on the side of the groove and along the spot welding point to preheat and melt toward the root. When you hear the “plop” sound of the arc penetrating the groove, and when you see the molten hole and the formation of a molten pool seat, immediately lift the electrode to extinguish the arc.
Then re-ignite the other side of the groove, and the second molten pool should press 1/2 to 2/3 of the first molten pool that begins to solidify, so that the entire weld can be obtained by using left and right arc-extinguishing breakdown. Arc extinguishing requires the flexibility of the wrist to extinguish the arc cleanly every time, giving the molten pool a chance to solidify instantly.
The molten hole of vertical welding is about 0.8mm. If the molten hole is too large, it is easy to form welding spatter on the back side. If there is no molten hole, the back side is often not penetrated. The size of the molten hole must be kept uniform to ensure uniform penetration, full weld bead, and uniform width and height.
When replacing welding rod joints, clean the coating at the joint every time, re-ignite the arc in the groove, and continuously weld along the formed weld about 10mm to change the angle of the welding rod. When it reaches 90 degrees, it extends into the center of the welding seam and swings slightly left and right. At the same time, press the arc downwards, hear the arc sound, form a molten hole, and extinguish the arc immediately, so that the arc of the welding rod extends into the root of the weld, forming a dissolved hole and immediately extinguishing the arc.
Then use the same bottom welding method as the first electrode, alternate left and right cycles of arc extinguishing and breakdown, and concentrate on every action. Pay attention to the outline of the welding hole and the melted gaps on both sides. The melted gap at the root of the groove can only be seen when the arc moves to the other side. If you find that the blunt edge is not fused well, point the arc slightly downward to achieve good fusion. Control the arc extinguishing time each time so that one third of the molten pool is not solidified before starting the arc again.
When closing the arc, it should be noted that when each welding rod is only 80 to 100mm long, the welding rod will melt faster due to overheating. At this time, the arc extinguishing time should be extended to allow the molten pool to solidify instantaneously to prevent the high-temperature molten pool from falling and forming weld nodules. When there is only 30 to 40mm of the welding rod left, prepare to perform the arc extinguishing action. Drop two or three drops continuously on one side of the molten pool to slowly cool down the molten pool. This can prevent defects such as shrinkage holes and arc crater cracks on the front and back of the weld bead.
If the temperature of the molten pool is well controlled, the quality of the weld can be improved.
The middle layer soldering wave is required to be flat. For the middle two layers, the diameter of the welding rod is φ3.2mm, the welding current is 115~120A, and the angle of the welding rod is about 70°~80°. The zigzag rod moving method is used, and the welding rod angle, arc length, welding speed and residence time on both sides of the groove are used to control the molten pool temperature. Make both sides well fused and ensure the shape of the oblate molten pool.
When welding the third layer, do not damage the edge of the groove and leave a depth of about 1mm to make the entire filler bead smooth. The edge of the groove above the depth is used as the baseline to lay the foundation for the cover surface. Generally, the left and right swings are used to stop a little more on both sides of the groove to melt the edge of the groove by 1 to 2mm, and to ensure that the temperatures on both sides of the molten pool and the groove are balanced.
Mainly observe the shape of the molten pool, control the molten pool into a crescent shape, stay less on the side with more molten pool, and stay more on the side with smaller molten pool, and calculate the height and width of the weld while welding. Because the welded meat of vertical welding is thicker than that of flat welding, pay attention to the shape of the molten pool and the thickness of the welded meat.
If the lower edge of the molten pool convexes from a flat edge, it means that the temperature of the molten pool is too high. At this time, the arc burning time should be shortened and the arc extinguishing time should be extended to reduce the molten pool temperature. The crater must be filled before replacing the welding rod to prevent crater cracks.
Ensure that the strip transport method is correct so that the weld can be formed well.
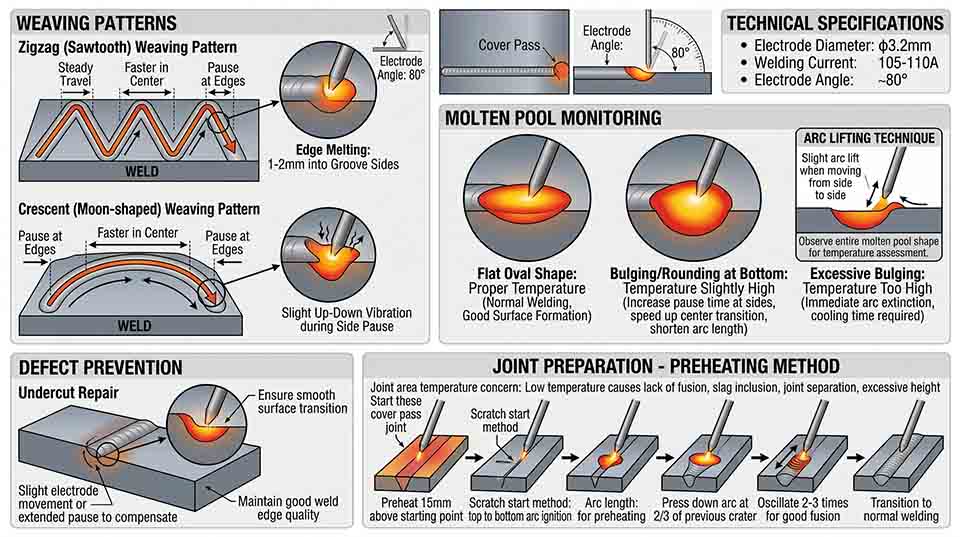
When covering the surface welding, the zigzag or crescent-shaped strip transport method can be used during welding. The strip transport should be stable, the speed should be slightly faster in the middle of the weld bead, and the strip should stay briefly on both sides of the groove. The process specifications are that the diameter of the welding rod is φ3.2mm, the welding current is 105~110A, the angle of the welding rod should be kept at about 80°, the welding rod swings left and right to melt the edge of the groove by 1~2mm, and it vibrates slightly up and down when both sides are stopped.
But when the welding rod moves from one side to the other, lift the arc in the middle slightly and observe the shape of the entire molten pool. If the molten pool is flat and oval, it means that the temperature of the molten pool is more suitable, normal welding can be performed, and the weld surface is well formed. If it is found that the bulge becomes rounded below the molten pool, it means that the temperature of the molten pool is slightly higher, and the electrode transportation method should be adjusted immediately, that is, the residence time of the electrode on both sides of the groove is increased, the intermediate transition speed is accelerated, and the arc length is shortened as much as possible.
If the molten pool cannot be restored to a flat elliptical state and the bulge increases, it means that the temperature of the molten pool is too high. The arc should be extinguished immediately to give the molten pool time to cool down and then continue welding after the temperature of the molten pool drops.
When covering the surface, make sure the edge of the weld is good. If you find that the undercut welding rod moves a little, or stays a little longer to make up for the defect, the surface will be smooth after the transition.
When the cover joint is welded, the temperature of the weldment is relatively low, which can easily cause defects such as poor fusion, slag inclusion, disconnection of the joint, and excessive height. Therefore, the quality of the cover directly affects the surface shape of the weld. Therefore, the preheating method is used to weld the joint. About 15mm above the welding end, the arc is ignited from top to bottom using the scratching method, and the arc is stretched 3 to 6mm to preheat the welding point. Then lower the arc and swing it 2 to 3 times at 2/3 of the original arc crater to achieve good fusion and then switch to normal welding.
Although the positions of the welds are different, they also have common rules. Practice has proved that by selecting appropriate welding process parameters, maintaining the correct angle of the welding rod, mastering the three actions of the good luck rod, and strictly controlling the temperature of the molten pool, excellent weld quality and beautiful weld formation can be obtained during vertical welding.
Post time: May-13-2026