
In GMAW (gas metal arc welding) practice, horizontal welding is a position that many beginners have mixed feelings about. It’s easier than vertical or overhead welding, but if parameters and technique are wrong, the weld tends to “drip” (sag) or show undercut.
The primary challenge in horizontal welding (position 2G) is gravity. The molten metal naturally tends to sag due to gravity; if not properly controlled, you end up with undercut on the top edge and excessive reinforcement (weld beads/icicles) on the bottom edge. Let’s get straight to the point: we’ll discuss how to dial in your current settings and master your torch manipulation techniques to achieve a clean, uniform, and aesthetically pleasing weld bead.
1. Current Selection: Lower than Flat, Higher than Vertical
Current setting is critical for horizontal welding. Too high, and the puddle becomes too fluid and sags; too low, and the puddle is sluggish, leading to slag inclusions and lack of penetration.
The golden rule: Horizontal welding current should be about 10-15% lower than flat welding current.
For a common 1.2mm solid wire, refer to the following ranges:
- • Thin plate (under 3mm): 100-130A, 18-20V. For thin plates, burn-through is the biggest risk — keep current low and travel speed fast.
- • Medium plate (3-10mm): 140-180A, 19-22V. This range provides adequate penetration and good bead profile.
- • Thick plate (over 10mm): 160-200A (root pass on the lower side, fill and cover passes can go up to 200A), 20-24V. Thick plates usually require multi-pass welding.
Matching voltage to current:
Rule of thumb: Voltage ≈ Current × 0.05 + 14 (±2V).
Listen to the arc:
For horizontal welding, the arc sound should be crisp and continuous “buzzing.” If it sounds dull with popping noises, voltage is too low. If the sound is erratic, voltage is too high.
Watch the arc length:
Always use a short arc (1-3mm). A short arc increases arc force, helping to support the puddle and prevent sagging.
2. Electrode Manipulation: Slanted Zigzag is the Way
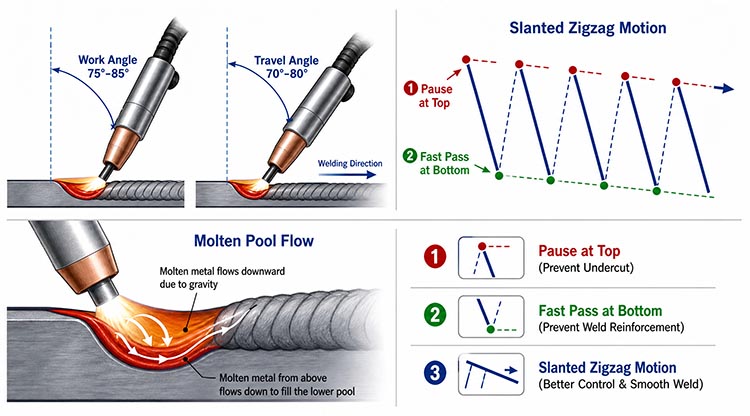
There are several manipulation techniques for horizontal welding, but for most conditions, the slanted zigzag is the most practical and easiest to master.
Gun angle:
- Left-right angle (work angle): Keep the gun 75-85° to the workpiece surface (slightly tilted downward or perpendicular). Do not tilt too far downward, or shielding gas will drift, causing porosity.
- Front-back angle (travel angle): Tilt the gun 70-80° relative to the welding direction (pushing angle, i.e., gun pointing opposite to travel direction). This helps you observe the puddle and uses arc force to support the molten metal.
Slanted zigzag technique explained:
“Pause on top, move fast on the bottom, natural transition across the middle.”
Other techniques:
Straight reciprocating: Suitable for thin plate (2-3mm). Small back-and-forth motions along the joint.
Crescent: Suitable for wider grooves. Follows a crescent-shaped path (pause on top, fast on bottom).
3. Common Defects and Quick Fixes
| Defect | Possible Causes | Solution |
|---|---|---|
| Overlap (Sagging) | Excessive current, slow bottom speed, long arc. | Reduce current, move faster at bottom, shorten arc. |
| Undercut (Top) | Too high voltage, no pause at top, wrong angle. | Lower voltage, extend pause at top, aim at top edge. |
| Convex Bead | Too fast travel, low current, narrow weave. | Increase current slightly, slow down, widen weave. |
| Porosity | Low gas flow, wind, excessive stick-out. | Check gas (15-25 L/min), use screen, keep stick-out 10-15mm. |
4. Practical Tips from Experienced Welders
Multi-pass welding is a must: If plate thickness exceeds 6mm, don’t try to finish in one pass. Bevel the joint and use multi-pass welding. Root pass must penetrate fully, fill passes should be flat, and cover pass should be neat.
Keep your eyes on the puddle: Always watch the puddle and the flow of molten metal. During horizontal welding, you’ll notice metal wants to flow downward. Adjust gun angle and speed to “herd” the puddle within the weld zone.
Arc starting and crater filling: When starting, strike the arc 4-5cm behind the weld start, then move to the starting point — this prevents slag inclusion at the start. When finishing, pause at the crater for a few seconds or make small circular motions to fill the crater and prevent cracks.
Post time: Jul-06-2026